Wednesday, June 30, 2010

Drats....! Read the post below this first....

Oy! Can't believe this picture fell out of the sequence.....

Anyway.....it's the Hatter's worktable. I made a similar one to take to the July show to offer for sale. It has a Mad Hatter's hat instead of the lady's hat and the color scheme is a bit different. I made both tables...the legs are miniature spools. Appropriate, eh? The tiny spools of thread were wound onto Tiny Turnings; the larger spools were purchased and the ribbon wrapped 'round. The mirror was a give away prize from Kate Whitaker. All the lace flats were wound by hand and stacked on the shelf. The boxes are also from templates I found online.


Apparently lost this one as well....made the little upholstered bench. This is a good shot of one of Kat the Hat's primitive hats with the mushrooms. That is her steampunk hat on the window sill.


The Victorian mourning hat was made by Nancy Manders....I bought it in Chicago. I made the bride's hat and all the other's in here, including the little silk bags and the 2 parasols.
Hat boxes are from templates I got online...I traced them onto scrapbook paper. The hall tree/hat stand was an old piece that was repainted and "shabbied" for this project. The Queen of Hearts round table just sort of came together while I'll was playing with spools.

I hope I haven't forgotten anything....

Off to get ready for a tea party!

Later

Tabitha

Oh my ears and whiskers.......

....it's getting very late! We must hurry!


Come.....follow me.....
We'll find the Hatter........


Perhaps in his workroom?

He's been hatter to the Court for a very long time.......


Ah.....there's his hat.....
He'd like you to join him for tea.....


But it IS getting very late......


Drink Me.......

....and don't forget the Key.....!


...or you won't be able to open the door!

See you on the other side....

Later,

Tabitha

The White Rabbit!


Because he is sooo very special to me (and Alice!), I wanted to give a special post to the White Rabbit wonderfully made by our own Debie Lyons from

http://piskies-and-poppets.blogspot.com/

I've taken him from all angles, not only to show off all of his perfection but, sadly, to practice my photography skills. I cracked open the camera manual this morning and learned a few things from the basic section. Later, I'll move on the "advanced" section. Apparently this little camera has the ability to take fabulous pictures.....now it's up to the person behind the lens.

We'll see......

Later

Tabitha

Tuesday, June 29, 2010

Alice..........at last!!

It seemed like a very ordinary English garden........


...unremarkable in every way, really....


.....until the Rabbit showed up.....


Woot! Well, here is, part 1 at least, of the Alice Project. I'll post additonal pictures of each section as I take them.....hopefully in some sort of order! And I'll explain about it as I go along. I have a few more detailed pictures of the entrance garden below but first and foremost is

The White Rabbit!!

Is he not the most amazing thing??!! Sculpted by none other than the fabulously talented Debie Lyons from http://piskies-and-poppets.blogspot.com/. Thank you again, Debie.....I LOVE him to pieces! In a later post, I will attempt to get some close ups so you can appreciate him more.


Below is a close up of the "sundial" thingy I made out of lamp parts and watchworks (I really don't have a very good name for it, do I?). The pansies were made from a kit I have had lying around for a bazillion years, likewise the poppies. There was not even a name on the package. The leaves for the poppies are laser cut ferns which came from ECI (no longer in business, apparently...you can see how long I've had some of this stuff...) The forsythia are simply natural broom bristles cover with color crumbled foam.


I have a daisy petal punch I purchased eons ago from the Mieth Co. A precision die cut tool that has lasted over 10 yrs and still punches just fine.

Those delphinium near the door are made following the recent tutorial from Nina of http://tudordollhouse.blogspot.com/2010/06/miniature-112-scale-delphinium-tutorial.html
I made mine in blue. I went back after and add tiny cream colored dots for the centers. I love the way they turned out. Thank you again for sharing that, Nina!


Stay tuned because as soon as the battery pack on my camera is recharged, I'll be back with more of the tour......

I think Alice will be following the White Rabbit through the door...

Later

Tabitha

Thursday, June 24, 2010

Voila! Exhibit 1

So I am calling this one "done" because sometimes you just have to...... It will become part of the Alice Project....the Hatter is pleased that at least he has someplace to park it now. :-D

While it is not exactly as I want it, I have learned a lot from the "doing" of it.

The upholstry was added because I did not like the looks of the ladderback of the chair....that worked out ok in the end, even though not planned. I am not pleased with the junctions of the trunk and branches and will work to make that transition smoother in Exhibit 2. I have some ivy that I may drape around the trunks of this one to disguise a few of the things that bother me.

I used an artist acrylic paint (in the tube) to coat the branches and that was ok but not perfect. Tallulah Belle suggested to try modeling paste which I am considering. If flexibility is not an issue, covering the wires with clay makes the best transition except I think it would be a little difficult to cover some of the thinner twigs and have them look thin. Nikki has suggested a type of thin, crimped spool wire which could hold the clay or paste better.

Thanks to everyone for their encouragement and suggestions.

I want to have a second try before I start on the "One". This time, I will make it (the chair) up as I go along rather than try to make it over an existing chair. I have a gazillion other things to do first....unfortunately...so I've made myself notes and hope I won't forget.

In the meanwhile, I'm putting all the last minute touches on the Alice Project....TG has agree to photograph tomorrow if I can get my act together by then.

And I didn't forget that bird's nest.....just have to make it....

Tabitha

Wednesday, June 23, 2010

Merlin's Throne..... in progress

I wanted to try and give you all a better view of Merlin's Throne. This picture should pop up bigger if you poke it. If you recall the legends of Camelot, when Merlin was fed up with the world of men, he simply disappeared. Some say he was captured by the Lady of the Lake; in other stories, it is more voluntary. My friend wrote a story in which Merlin is brought back to modern times using his "Three Relics"....his staff, his cloak and his throne. Because Melin and his magic were based in nature, he wanted the throne to reflect that so he envisoned it almost made from a living tree. Since he is a CGI artist as well as a storyteller, he was able to draw that concept. I have been wanting to reproduce this in miniature for a while but wasn't sure how to start. I was also captivated by that tree bed and saw it again recently. So I just decided to do it and see what happened.

Sometimes, the hardest part is getting started. :-)

Here is where a ended up yesterday. After twisting the wire (like forever!) I attached the branches to the sides of the chair with brass spool wire. Then I coated everything with thinned white glue....I used Sobo (made by Delta) because I have a lot of it. It is a PVA type glue like Aleen's Tacky.

When the glue was dry, I applied the polymer clay. It stuck very well to the film of dried glue. I was working with a combination of ethnic brown Proscuplt and some old blue original Fimo, again, because I had it.


In my rush, I stuck it in the oven (which proved a bit of a problem itself since the piece, with branches, is taller than my oven), totally forgetting that it needed tree texture BEFORE baking. Duh!

So when it cooled, I applied yet more clay and textured. Below is a close up of the tree texture after the second round.

I wired in a few more branches and coated those with thick white glue (per the advice of our lovely Nikki) and that is pictured below.


Lastly is a full view of the back....while we're waiting for glue to dry.
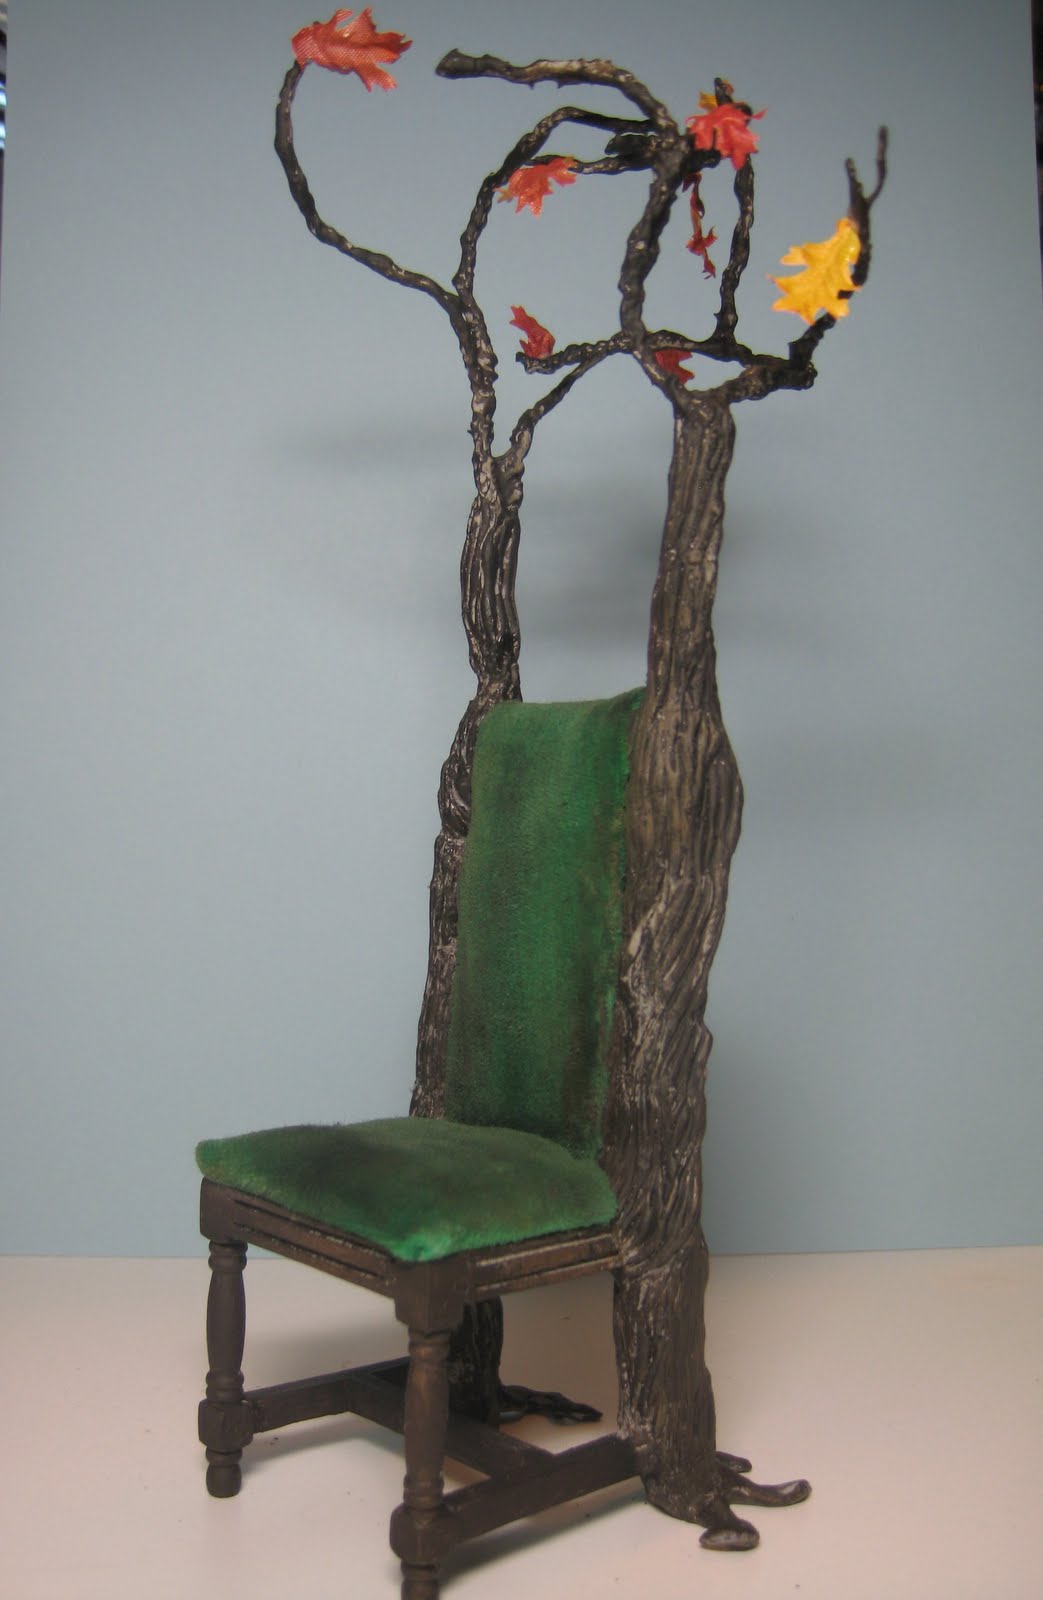
Since I am unsure of the final position of the branches, I hesitated to cover them with clay because once baked, they will lose most of their flexibility. Painting over the heavily glued wire armature with a coat of artist acrylics would allow me to fuss a bit.

I think, for this chair, I am going to make the bird's nest on top and use it in the Alice Project as I have yet to decide on a chair for the Hatter. I have some ratty old green velvet and maybe I'll cover the back and seat. We'll see.

I also have another unfinished chair like this and will probably make another before I start on George's piece. I think Merlin's throne will require that I actually make the chair base ... and I need a little more practice making branches.

Later,

Tabitha


Tuesday, June 22, 2010

Moving on..... A new WIP

So....I'm glad that was sorted out....finally....hopefully....

Anyway, in an effort to bring some fresh air, I've decided to start a new project.

...and yes, the Alice Project is nearing completion but sometimes I just need to step away for a bit. I'll be photographing by the end of the week. Er....what I mean is, I'm going to get TG to use his fancy camera to photograph and see what happens. If luck holds, I'll unveil it on the weekend.

But on to the new project.

It is based on two things. First was a full-sized bed I initially saw in an online catalogue by Shawn Lovell Metalworks http://www.slmetalworks.com/beds_a.html.

Second is a CG chair that a friend of mine who is a digital artist designed.

Right now, I am experimenting with this chair. We'll just have to see where this goes......


Yes, Jayne....I know exactly what you mean about sore fingers and callouses! My plan is to cover the necessary parts of the chair with polymer clay to simulate the tree and the wire with either clay, modeling paste or maybe just many layers of paint.

I have already had it together and apart and then back together again...... I now understand what Edison meant when he said, "I haven't failed.....I've discovered many ways in which it won't work...."

Later...

Tabitha

....I'm sorry....I do not know why the pictures are not popping up bigger when you poke them. I have dome nothing different in posting....that i ma aware of anyway......

Sunday, June 20, 2010

Lord a Luvin'..I'm being stalked!!...

...and so are most of the rest of you, apparently.

I mean last night I actually thought it was just me and a few others....most probably as a result of the "confrontation" I had with this individual just a week ago.

But it seems not......oh deary me! How utterly obnoxious....not to mention irritating.

Because now I'm going to have to stop posting any WIP (something I have considered recently) because one never knows who is lurking about ready to snatch the idea, throw some piece of crap together , call it "done" and start selling it on Etsy. Never mind calling it their "own made up idea" and offering a "certificate of authenticity" to boot!

It was the bogus "certificate" the recently set me off and prompted my message to this charming stalker who promptly informed me that I had cast a shadow over their day.....pity, that. Yes, of course, said she, does it really matter who had the idea first? We all often have the same ideas. She has a solid, satisfied and ever-growing customer base and will continue providing them with these miniatures at a much lower cost....

Rubbish....

So not only does she make knock-offs; she makes cheap knock offs....... I can only surmise that she is trawling for new things to make as her own. Even more galling is the fact the she has a caveat on her website that all her "handmade" items are covered by copyright laws... (ok...now I'm gagging....)

Sigh....

I have discovered that the miniature world is rife with people who have no problem taking someone else's work, blatantly copying it and then selling it. I guess it is the selling it that really rags me. I do understand if someone thinks they can reproduce a piece either because they do not wish to (or cannot afford to) spend the money to purchase it from the artist.

Some even think they can do it better....well, Bravo! to them. As long as it is for their own private collection or to give to a friend, I have no real problem with them.

It is only when they start profitting (or attempting to profit) from another's work that I get ornery. WTF??? Don't they have an original idea in their head? There is so much to be inspired by.


I don't really make many magical miniatures so I guess I have little to be anxious about except for the fact that at any given moment, the tide could turn and another miniature genre will replace it. I have decided to keep my work under wraps until it is completed....not that it will make all that much difference....and to sell my work only at miniatures shows or privately. I will no longer be listing anything on Etsy.

Oy....it's always something!

Sadly,

Tabitha

ADDENDUM: Let me clarify that while I am being "followed" by a known plageriser, I have yet to experience the heartbreak of finding copies of my work for sale by someone else. This has been the sad experience of several of my dear friends however and since the individual in question has been bold enough to add her name to my "followers" list, I felt the need to speak out and to take steps to protect my work. That is all.....

Tuesday, June 15, 2010

Quilling Paper Pots?

Hi everyone! I am still working like madwoman on my Alice project which I PROMISE I will post pictures of soon...really....

In the meantime I have a question about a recent blog entry I read.

A week or so ago, I was scanning blogger and came across a post where the miniaturist was making plant pots out of quilling paper. I have done this before but what was different about hers was that she then coated with, I think, gesso to give them not only strength but texure. While I thought I bookmarked this interseting project, apparently I did not because now I cannot locate it again.

Does anyone follower a blogger with such project?? I know it sounds like a Casey project but I couldn't find it on her blog so I am at a loss. If anyone recalls it, could you please leave a comment?

Thanks,

Tabby