Monday, November 23, 2009

Minaiture Glittered Houses

Let me start by saying I am not a big fan of Martha Stewart but I often bought the Holiday issues of the magazine because they were so pretty....

Now, onto business. Yesterday, I stumbled across some little cardboard glittered house in a local gift shop. They were to be used as Christmas tree ornaments and I remembered that my Grandmother had some that were her mother's.... and now my mother's. I think they came from Germany.


I recalled seeing an article about making them in one of the old MS Living mags so I started hunting through my collection and found it in the Christmas 2000 issue. I reduced the template by 45% and copied it onto colored cards stock. The directions say to paint both sides but I chose the colored cardstock instead. I didn't cut out the doors or windows. I will glue on a different color. Here are my steps:

I scored on the lines and glued the basic house toegther (this is actually the church). The I put the roof on, first one side then the other.

Then I made the steeple. and glued it to the roof followed by the steeple roof. This was a little futzy.

I also made a roofed entry ....

Not bad for a quick and dirty sample. I think I will use a different color for the roofs. I will stick with card stock, though and not paint it. I will thin the white glue just a bit, brush it on and then glitter.

I think I will reduce the template down to 35%. This church is 1in by 2in by 2.5 in high. It is ok for a table decoration but I think I'd like it a little smaller. There is a smaller house template that may be ok. I haven't tried it yet.

I would love to share this template with you but I am not sure how to do that. I have the fullsized template saved to my 'puter as a pdf. Any advice how to make that availlable?

Actually, I have found the article on line and it includes the template. You can reduce it to any size you wish. Just go here:

Glittered Houses

Tabitha

Monday, November 16, 2009

Remember Mug Drumpus....?

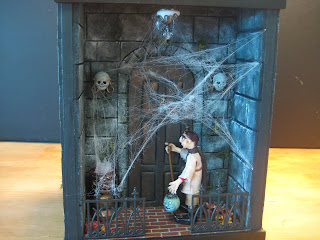
...The snarky little Troll went Trick or Treating by himself...no adult supervision! Bad boy..

....and look where he headed first thing!


But there were lots of nice treats inside...event though a the remains of who knows who were lurking off to the side. The resident witch has left her new broom from Kat leaning against the door so I imagine she'll be back to hand them out soon. He'll have to be patient...a trait he, like most trolls, is in short supply of. :-)

Seriously... Remember back to the first show I did way back in July? The pitiful one where the highlight was winning the purple ribbon for best overall exhibit? This is the little "inside/outside" roombox that won. I couldn't get a really good longshot so there isn't one but I think the close-ups are good.
The outside porch light, smoldering cauldron (see in the corner behind the cobwebs) and inside chandelier illuminate with a battery pack hidden under the roof (not shown but it is a mansard with gargoyles and a vulture on the top).
The pumpkins on the table and floor also light up. I made the vignette from a tutorial I found on line. The lights are a string of 10 with a battery pack used for Christmas decorations.
Kat the Hat Lady made the broom. Mug's trick or treat pail and the skeleton parts are from Micheal's. Other that I made everything else. I've had the box for ages. Used styrofoam trays from the grocery for the stone on the inside and outside of the box. Light weight, cheap, easy to use and paint.This weekend, I traveled to another miniature show.
Very few dealers (with little stock) and only 3 artisans but I did manage to pick up a few items. My biggest coup was this Abbey corner from a company called Earth and Tree. There was a club table where members could sell things they no longer wanted or needed. Someone started this project and decided it wasn't for them. I snapped it up for a song. It's a sturdy piece but not too heavy.
My friend Larry Bolduc from Unicorn Studios (designer of the Great Hall and class instructor) was there with some of his new medieval castings. I love this fireplace surround and will probably add a third wall to the Abbey and use it there.
You can see Larry's things at www.larrybolduc.com
I am sorry that I haven't been blogging much myself lately. I've been up to my elbows in alligators (as they say) with costuming for the Merry Wives of Windsor. This tech week so it's crazy and opening night is Friday. All I can say is that it is a boatload of work for three performances. I have been reading what everyone else is up to though....so many busy people!
Tabitha

Wednesday, October 28, 2009

Artisan Thomas Saunders

When the maillady showed up today she brought me a package from Canada. In it were two of the cutest little boxes....notice the message on the one.... from Tom Sanders. He does beautiful turnings in stone, wood and acrylic. Health problems have prevented him from "turning" much this year and he thought he might not be able to return to it at all. So imagine my surprise when I stumbled across these pieces of his on Esty. Naturally, I snapped them up!

One of the really cool things he does is the little certificate of authenticity. Each piece is numbered and signed. I bought two bowls, a serving platter and a mortar and pestle. You can poke the pictures to make them bigger....


Here're some better side views......


I put the morter and pestle on the serving tray to show better against the pale grey stone.

I haven't found a website or blog for him but you can visit his Esty shop:
Tabitha

Monday, October 19, 2009

Grace White....amazing!

I stumbled across this extremely talented lady this morning whilst surfing the Net. Her minatures are inspired by "Master and Commander" (film/book?) and I am blown away by her skill and imagination. She is a book conservator by training and I this attention to detail shows in her miniature creations.

Below is just a teeny example of what she has done in the form of books but there is so much more that you all must go to her photostream and see for yourselves. I love all of it!
http://www.flickr.com/photos/graceewhite/

On the right side bar, click on either "Aubrey-Maturin" miniatures or "Other mini's". You are in for a real delight! I looked for a blog or website but couldn't find one.

Tabitha

Saturday, October 17, 2009

Brass "stuff" from the hardware store...

For Nikki...and anyone else who is interested. Sometimes I spend hours at the hardware store looking for things suitable for mini's.

In the Chronographoscope below, I used lamp bits and pieces for the stand. All found at my local hardware store and all solid brass. Makes for a nice sturdy stand. I have no idea what this is called or what it is really used for but I think it lends it self to something. It is metal and it comes in several sizes. This is the smallest.

This is a compression fitting for gas line hook-ups. It also comes in several sizes. This is the middle size, I think. I used it on the end of one of my large telescopes.
This is called a knurled nut. It comes in three sizes. This is the middle size. I've used these for lots of things. Again, solid brass.


So you never really know where you are going to find "stuff" for mini's. Give your neighborhood hardware store a try. Poke the pictues for a closer look.
Happy Hunting!
Tabitha

Wednesday, October 14, 2009

Of super bargains and super friends!

I have been such a bad, bad blogger of late. Life, in the form of costuming the HS production of The Merry Wives of Windsor, has truly gotten in the way of my "mini-ing". But I have kept up with each and every one of you and I'm incredibly awe-inspired when I see what you're up to.

Meanwhile, yesterday was a very excellent day for several reasons. In scouring the thrift shops for appropriate shoes for our characters (any idea how HARD it is to find a pair of size 13 wedgies???), I discovered this little mirror. Not mini but only about 8" around. I collect unique or unusual mirrors and this fit my criteria. I couldn't reach it to see the price and when I asked the clerk she said that is was $10 (excellent!) but because it had been around awhile, she would take $8 (even excellenter!) and then, because she noticed a few dings, she made it $5 (wow!).

When she took it down to wrap, the backing came off ; not a big deal for me, but she then said:

"mmmm....ok, this is how I'm going to handle this", and she handed me the bag and said "no charge. Hope you can fix it. Have a great day!" Whoa!! I love this little mirror!


When I got home, I found a package at the front door and inside was Mr. Scroll Pot!! (that is a pretty lame moniker...have to come of with something else..) But regardless of what he's called, he is ABSOLUTELY AMAZING!! The pictures simply do not do justice to Nikki's beautiful work. It is hard to believe she hasn't been sculpting all that long. He is exquisite and I am thrilled beyond words to own him.

She also included some of her fabulous wrapped scrolls. I don't know where she gets her printables for these or how she gets them so crisp and clear and readable. I am almost ashamed to put them next to my paltry attempts in Merlin's Retreat where everything had found a home.

Back to costumes for now. And thank you, Nikki for your wonderful creations!

Tabitha

Monday, September 14, 2009

The Joys of "Bug Pins"....

I have been a terrible blogger of late but non-mini things seem to be taking up far too much of my time. I have been trying to keep up with everyone else though and when I read Liberty Bibberty's latest blog entry about draping fabric using the pin and spray method, I had an epiphany.

Bug Pins!

She commented that there were pin holes in the fabric after it dried which needed to be dealt with. Easy with cotton but not so easy with silk or other fine fabric. However, these holes can be eliminated entirely with the use of entomologist's pins instead of regular straight pins.
I have been using them for years, even since a woman I know introduced me to them during a class in mini-doll costuming. I use the finest ones.... 0, 00 or 000. They do not rust, are flexible if you need them to be and supersharp. They never leave little pulls in the fabric and because they are so very thin, there are no holes to be seen! Cool, eh?
I got mine at a museum shop about 10 years ago but, like most things these days, they are available on line from a variety of sources. Here's one:
Just click on "insect pins". Or google for other sources.
Tabitha